Angular Template Driven Form Validation
In this tutorial, we will learn template-driven form validation in Angular. Here, we will explain the following points related to the angular validations:
- HTML 5 Validation Attributes
- Angular validation Attributes
- Template-driven Form Validation
- Template
- Component Class
- Disabling the Browser validation
- Adding in Built-in Validators Required, Minlength, Maxlength, Pattern
- Displaying the Validation Error messages
- Dirty and Touched Attributes
- Disable Submit button
- Final Template code
- Output
When we develop HTML 5 form there are some common attrbutes to validate the forms controls and these attributes are as following.
1. HTML 5 Attributes
- required: Value is required.
- minlength: The minimum characters are required as a value.
- maxlength: The maximum characters are required as a value.
- pattern: The value should match the pattern.
Similarly we can also use angular control and form attributes.
2. Angular Attributes
In Angular, we can validate HTML controls as well as forms with some predefined attibutes. There are different attributes available to validate forms control which return the value true or false.
- untouched: The control is not touched yet.
- touched: A control is touched if the user has triggered a blur event on it.
- pristine: The controls value is not modified or changed yet.
- dirty: A control is dirty if the user has changed the value in the UI.
- invalid: The controls value is not valid.
- valid: The controls value is valid.
We can also validate Form also using the following attributes.named as:
- pristine: Not any controls value has modified yet.
- dirty: Some or all controls values have modified yet.
- invalid: Form is not valid since control value is not valid.
- valid: Form is valid.
- submitted: The form has submitted.
3. Template Driven form Validation
In this method, HTML tag is used to create forms such as login forms, contact forms. Angular automatically interprets and creates a form object representation for the HTML tag. Template driven forms use two way data binding to update the data model in the component as changes are made in the template and vice versa. In template-driven forms, The directive NgModel is used to create and manage a FormControl instance for a given form HTML element.
When we create a template driven form with different types of control like input, dropdown, checkbox etc to handle the behavior of template in angular. In angular, you can validate controls and form also. Angular have several built-in validators. You can also create your own custom Validator in Template driven form.
4. Template
In template, we consider the following form fields firstname, lastname email, gender.
<form">
<p>employee Form</p>
<p>
<label for="firstname">First Name</label>
<input type="text" name="firstname" >
</p>

<p>
<label for="lastname">Last Name</label>
<input type="text" name="lastname" >
</p>

<p>
<label for="email">Email </label>
<input type="text" id="email" name="email" >
</p>
<p>
<label for="gender">Geneder</label>
<input type="radio" value="male" name="gender" > Male
<input type="radio" value="female" name="gender"> Female
</p>
<p>
<button type="submit">Submit</button>
</p>
</form>
<router-outlet></router-outlet>
5. Component Class
In the component class we adda model named employee looks like as:
import { Component, ViewChild, ElementRef, OnInit } from '@angular/core';
@Component({
selector: 'app-root',
templateUrl: './app.component.html',
styleUrls: ['./app.component.css']
})
export class AppComponent{
title = 'TemplateDrivenformValidation';
employee = {
firstname:"",
lastname:"",
email:"",
gender:"",
}
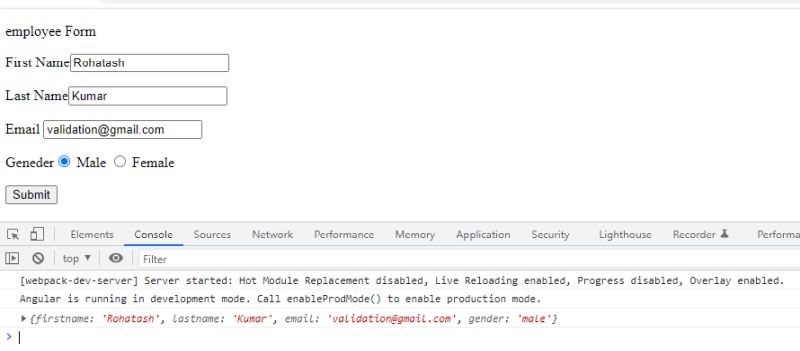
onSubmit(EmployeeForm:any) {
console.log(EmployeeForm.value);
}
}6. Disabling the Browser validation
To disable by default browser validator interfering with the Angular validator. We use novalidate in form tag.
<form #EmployeeForm="ngForm" (ngSubmit)="onSubmit(EmployeeForm)" novalidate > 7. Adding in Built-in Validators Required, Minlength, Maxlength, Pattern
HTML5 validation attributes:
- required: Value is required.
- minlength: The minimum characters are required as a value.
- maxlength: The maximum characters are required as a value.
- pattern: The value should match the pattern.
Angular interprets these validation attributes and add the validator functions to FormControl instance. So we can add all the built in validator in input control.
<input type="text" name="firstname" [(ngModel)]="employee.firstname"
minlength="5" maxlength="8" pattern="^[a-zA-Z]+$" required>
In the above code we have added all the validators. Pattern ensures that the only letters are allowed.
8. Displaying the Validation Error messages
When we validate any form control need to show error message to the user. There two way we can give the reference of form control.
One way is to use the contactForm variable. We can use the below line of code if the firstname is valid.
EmployeeForm.controls.firstname
The
other way is to create a new local variable for each FormControl For Example,
the following creates the firstname variable with the FormControl instance.
firstname="ngModel"
For Example:
<input type="text" name="firstname" minlength="5" maxlength="8" pattern="^[a-zA-Z]+$" #firstname="ngModel" [(ngModel)]="employee.firstname" required>9. Dirty and Touched Attributes
We want to display errors only after the user has attempted to change the value. The dirty & touched properties help us do that.
- touched: A control is touched if the user has triggered a blur event on it.
- dirty: A control is dirty if the user has changed the value in the UI.
The below code difine the required , min, max and pattern validation. If any oneerror generate then it will fall in respective error message.
<div *ngIf="!firstname?.valid && (firstname?.dirty || firstname?.touched)">
<div *ngIf="firstname.errors?.['required']"><span style="color: red;">Please Enter firstname.</span></div>
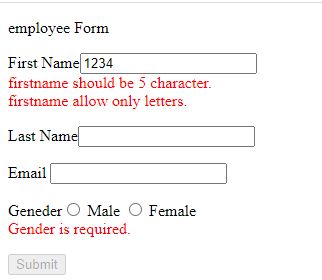
<div *ngIf="firstname.errors?.['minlength']"> <span style="color: red;">firstname should be 5 character.</span></div>
<div *ngIf="firstname.errors?.['maxlength']"> <span style="color: red;">Firstname should be 8 character.</span></div>
<div *ngIf="firstname.errors?.['pattern']"> <span style="color: red;">firstname allow only letters.</span></div>
</div>We use it to set the disabled attribute of the submit button. The following code looks like that:
<button type="submit" [disabled]="!EmployeeForm.valid">Submit</button>Finally we have added all the above attribute in the template code which looks like the below code:
<form #EmployeeForm="ngForm" (ngSubmit)="onSubmit(EmployeeForm)" novalidate >
<p>employee Form</p>

<label for="firstname">First Name</label>
<input type="text" name="firstname" minlength="5" maxlength="8" pattern="^[a-zA-Z]+$" #firstname="ngModel" [(ngModel)]="employee.firstname" required>
<div *ngIf="!firstname?.valid && (firstname?.dirty || firstname?.touched)">
<div *ngIf="firstname.errors?.['required']"><span style="color: red;">Please Enter firstname.</span></div>
<div *ngIf="firstname.errors?.['minlength']"> <span style="color: red;">firstname should be 5 character.</span></div>
<div *ngIf="firstname.errors?.['maxlength']"> <span style="color: red;">Firstname should be 8 character.</span></div>
<div *ngIf="firstname.errors?.['pattern']"> <span style="color: red;">firstname allow only letters.</span></div>
</div>
<p></p>
<label for="lastname">Last Name</label>
<input type="text" name="lastname" #lastname="ngModel" [(ngModel)]="employee.lastname" minlength="5" maxlength="8" pattern="^[a-zA-Z]+$" required>
<div *ngIf="!lastname?.valid && (lastname?.dirty || lastname?.touched)">
<div *ngIf="lastname.errors?.['required']"><span style="color: red;">Please Enter lastname.</span></div>
<div *ngIf="lastname.errors?.['minlength']"> <span style="color: red;">lastname should be 5 character.</span></div>
<div *ngIf="lastname.errors?.['maxlength']"> <span style="color: red;">lastname should be 8 character.</span></div>
<div *ngIf="lastname.errors?.['pattern']"> <span style="color: red;">lastname allow only letters.</span></div>
</div>
<p></p>
<label for="email">Email </label>
<input type="text" id="email" name="email" #email="ngModel" [(ngModel)]="employee.email" required>
<div *ngIf="!email?.valid && (email?.dirty || email?.touched)">
<div *ngIf="email.errors?.['required']"><span style="color: red;">Please Enter Email.</span></div></div>
<p> </p>
<label for="gender">Geneder</label>
<input type="radio" value="male" name="gender" #gender="ngModel" [(ngModel)]="employee.gender" required> Male
<input type="radio" value="female" name="gender" #gender="ngModel" [(ngModel)]="employee.gender" required> Female
<div *ngIf="!gender?.valid && (gender?.dirty || gender?.untouched)">
<div *ngIf="gender.errors?.['required']"><span style="color: red;">Gender is required.</span></div></div>
<p>
<button type="submit" [disabled]="!EmployeeForm.valid">Submit</button>
</p>
</form>
<router-outlet></router-outlet>
12. Output
Now run the application.
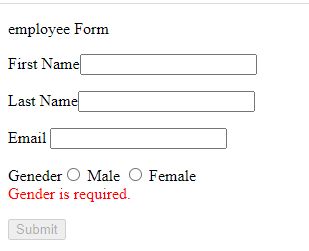
Now Touch the cursor from first name field.

When we enter number so it will show lenth and pattern validation error message.
So we can also check all the the fields validations.
Prev Next