Angular Routing
What is Routing?
A website or application have many pages. When we redirect one page to another page. So it is called routing in application. Navigation makes it easy for users to find what they are looking for in web applications or website. Angular support single page application development so one page is devided in multiple sections. Every section defines a unit of code or specific task which is called component in angular. So when we navigate from one section to another section or component. It can be simply achieved by implementing routing in angular.
Single Page Application
Single page application as named suggested it loads a single HTML page. It works inside a browser when HTML page loaded on the browser and we click any part of the page. only that part of the page will be update not entire page. Single Page Applications are Gmail, Google Maps, Netflix, Paypal and many more.
Create an application
The following command uses the Angular CLI to create a Angular application. The application name in the following example is Angular Routing.
ng new AngularRouting
Adding components for routing
The following command uses the Angular CLI to create component. The components name in the following example is home, about, contact.
ng generate component home
ng generate component about
ng generate component contact
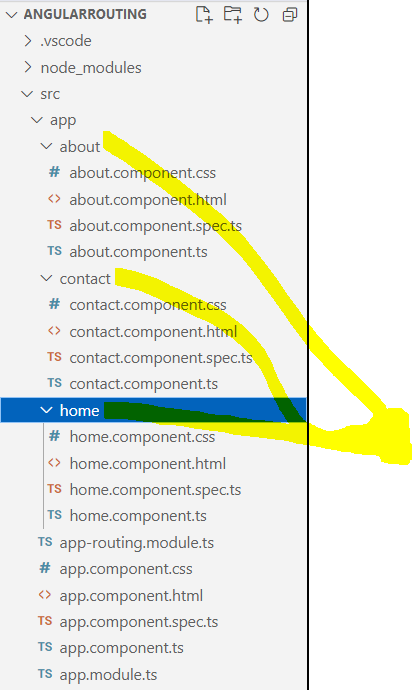
After creating our components, we will have three components in separate folders shown in below image.
Now we will open about.component.html from the about folder and add the following code to show on browser lator.
Now we will open home.component.html from the home folder and add the following code to show on browser lator.
Now we will open contact.component.html from the contact folder and add the following code to show on browser lator.
Importing your new components
We open app-routing.module.ts which looks like below:
import { NgModule } from '@angular/core';
import { RouterModule, Routes } from '@angular/router';

const routes: Routes = [];

@NgModule({
  imports: [RouterModule.forRoot(routes)],
  exports: [RouterModule]
})
export class AppRoutingModule { }
Import RouterModule and Routes into your routing module. To use created components, importing them into app-routing.module.ts at the top of the file as follows:
import { HomeComponent } from './home/home.component';
import { ContactComponent } from './contact/contact.component';
import { AboutComponent } from './about/about.component';Now define your routes in your Routes array.
const routes: Routes = [
  { path: 'about', component: AboutComponent },
  { path: 'home', component: HomeComponent},
  { path: 'contact', component: ContactComponent },
];
After importing and define route array. app-routing.module.ts file looks like below:
import { NgModule } from '@angular/core';
import { RouterModule, Routes } from '@angular/router';
import { HomeComponent } from './home/home.component';
import { ContactComponent } from './contact/contact.component';
import { AboutComponent } from './about/about.component';

const routes: Routes = [
  { path: 'about', component: AboutComponent },
  { path: 'home', component: HomeComponent},
  { path: 'contact', component: ContactComponent },
];

@NgModule({
  imports: [RouterModule.forRoot(routes)],
  exports: [RouterModule]
})
export class AppRoutingModule { }
<router-outlet> - This element informs Angular to
change the application view with the
components for the selected route which you defined.
Routes
-Define your routes in your Routes array.
We add the following code to the app.component.html
<nav>
<a routerLink="/home">Home</a>
<a routerLink="/about">About</a>
<a routerLink="/contact">Contact</a>
<div class="animation start-home"></div>
</nav>
<router-outlet> </router-outlet>
Add the css code to design menu in app.component.css
nav {
position: relative;
width: 590px;
height: 50px;
background-color: #34495e;
border-radius: 8px;
font-size: 0;
}
nav a {
line-height: 50px;
height: 100%;
font-size: 15px;
display: inline-block;
position: relative;
z-index: 1;
text-decoration: none;
text-transform: uppercase;
text-align: center;
color: white;
cursor: pointer;
}
nav .animation {
position: absolute;
height: 100%;
top: 0;
z-index: 0;
transition: all .5s ease 0s;
border-radius: 8px;
}
a:nth-child(1) {
width: 100px;
}
a:nth-child(2) {
width: 110px;
}
a:nth-child(3) {
width: 100px;
}
a:nth-child(4) {
width: 160px;
}
a:nth-child(5) {
width: 120px;
}
nav .start-home, a:nth-child(1):hover~.animation {
width: 100px;
left: 0;
background-color: #1abc9c;
}
nav .start-about, a:nth-child(2):hover~.animation {
width: 110px;
left: 100px;
background-color: #e74c3c;
}
nav .start-blog, a:nth-child(3):hover~.animation {
width: 100px;
left: 210px;
background-color: #3498db;
}
nav .start-portefolio, a:nth-child(4):hover~.animation {
width: 160px;
left: 310px;
background-color: #9b59b6;
}
nav .start-contact, a:nth-child(5):hover~.animation {
width: 120px;
left: 470px;
background-color: #e67e22;
}
body {
font-size: 12px;
font-family: sans-serif;
background: #2c3e50;
}
h1 {
text-align: center;
margin: 40px 0 40px;
text-align: center;
font-size: 30px;
color: #ecf0f1;
text-shadow: 2px 2px 4px #000000;
font-family: 'Cherry Swash', cursive;
}
p {
position: absolute;
bottom: 20px;
width: 100%;
text-align: center;
color: #ecf0f1;
font-family: 'Cherry Swash',cursive;
font-size: 16px;
}
span {
color: #2BD6B4;
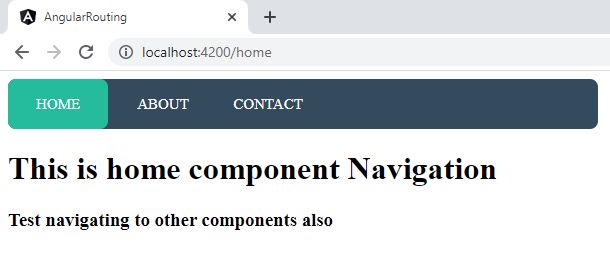
}Now run the application. Open with the following URL: http://localhost:4200/home
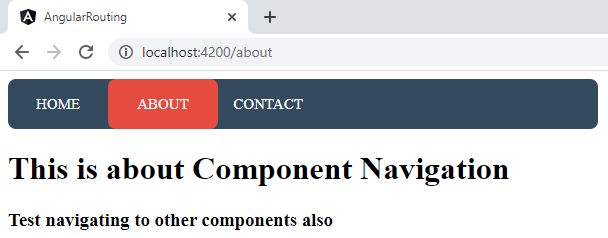
Now click on the About Link: URL: http://localhost:4200/about
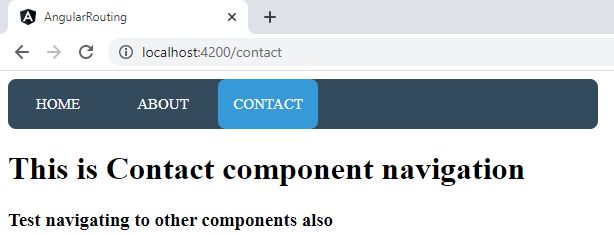
Now click on the Contact Link: URL: http://localhost:4200/contact
Prev Next