Angular Data Binding
Data Binding in Angular
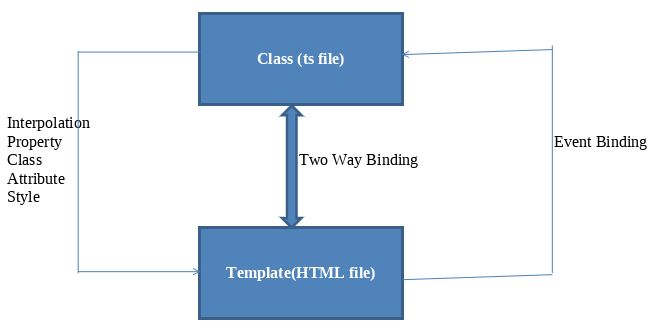
Every angular component have one class file (.ts file) and a corresponding template file (html file). When work on angular component in application you have to pass data between both template and class file. In this tutorial, we will see how to bind data from class file to template and vice-versa.
Types of Data Binding in Angular
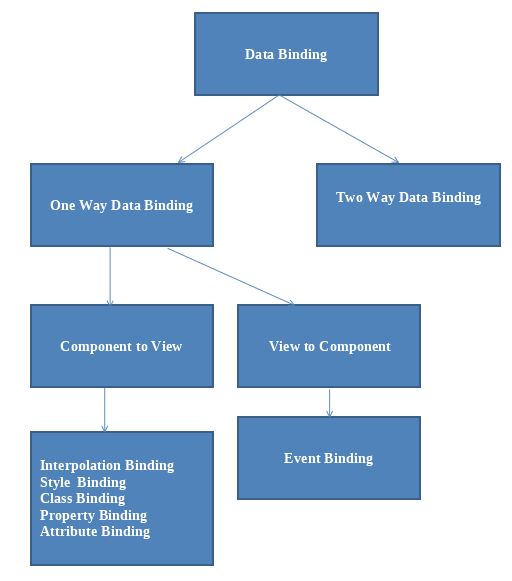
There are two type of binding in angular. that is called one-way-binding and two-way-binding. The following figure shown bothe type of databinding and also further classification:
Why binding in angular?
In angular mainly data binding take place in between component (.ts file) and template (HTML file). The following figure show the simple way of binding:
1. One Way Data Binding
One-way data binding is a one-way interaction od data between component and its template. If you perform any changes in your component, then it will reflect the HTML elements and vice-versa. You will see following one way data binding:
1. Display data from component to view
- Interpolation or string
- Property
- Class
- Attribute
- Style
2. Display data from view to component
- Event Binding
1. Interpolation Binding (String Interpolation)
It is denoted by the expression of {{ }}. Interpolation binds the data in one-way, data moves in one direction from the components to view or HTML elememnts. It is the process of formatting or manipulating strings.
Add the following code in component.ts file.
export class AppComponent {
  //String Interpolation
  name = 'Rohatash';
  }
Add the following code on template or html file
<h1>Name={{name}}</h1>2. Property Binding
It is denoted by [Property name]. It is used to bind the property of the HTML element from the class file.
Add the following code in component.ts file.
//Property Binding
imageurl="http://tutorialstrend.com/Images/Angular/TypeScript/TypeScript.jpg";
Add the following code on template or html file
<h1><img [src]="imageurl"></h1>
3. Class Binding
It is denoted by []. It is used to bind the class of the HTML element from the class file.Add the following code in component.ts file.
//Class
BindingClassname="blue";
Add the following code on template or html file
<style>
.blue {background-color: blue; }
</style>
<p
[class]="Classname">Rohatash</p>
4. Attribute Binding
It is used to bind the data from component class file to HTML attributes.Add the following code in component.ts file.
//Attribute
 Bindingnameattribute = 'Rohatash';
Add the following code on template or html file
<input type="text" [value]="nameattribute">
5. Style Binding
It is used to bind the data from component class file to HTML style property.Add the following code in component.ts file.
//Style
bindingStyleColor = 'red';
Add the following code on template or html file
<p [style.color]="StyleColor">Style binding check</p>
6. Event Binding
Event binding is used to handle the events raised from the HTML file or template like button click, mouse move etc.
Add the following code in component.ts file.
//Event
Clickcount:number=0;addcounter(){
  this.count++;
}
Add the following code on template or html file
<button (click)="addcounter()">Check Event Add count</button>
<p>Check
Count: {{count}}</p>
2. Two-way data binding
Two way data binding as name suggested data flows will be in both direction (from component to views and views to component) as shown in above figure. To use import FormsModule into App.module.ts file of the application and include it into imports array.

In two way data binding you use ngModel directive and it is used such as [(ngModel)] in template file(HTML file).
Add the following code in component.ts file.
//Two way data Binding
EmployeeName:string="";
EmployeeAge:Number=0;
Add the following code on template or html file
<input type="text" [(ngModel)]="EmployeeName">
<input type="text" [(ngModel)]="EmployeeAge">
<p>Employee Name is: {{EmployeeName}}</p>
<p>Employee Age is: {{EmployeeAge}}</p>
Now, if you update the value of input text-box in our view it will automatically update in the name and age property of our component and vice-versa in view. So it is called two way binding.
To run all the binding code paste the below code in App.component.ts.
import { Component } from '@angular/core';


@Component({
  selector: 'app-root',
  templateUrl: './app.component.html',
  styleUrls: ['./app.component.css']
})
export class AppComponent {
  //String Interpolation
  name = 'Rohatash';
  // Property Binding
  imageurl="http://tutorialstrend.com/Images/Angular/TypeScript/TypeScript.jpg";
  //Class Binding
  Classname="blue";
  //Attribute Binding
  nameattribute = 'Rohatash';
  //Style binding
  StyleColor = 'red';
  //Event Click
  count:number=0;
  addcounter(){
      this.count++;
  }
  //Two way data Binding
   EmployeeName:string="";
   EmployeeAge:Number=0;
}
Add the following code on App.component.html.
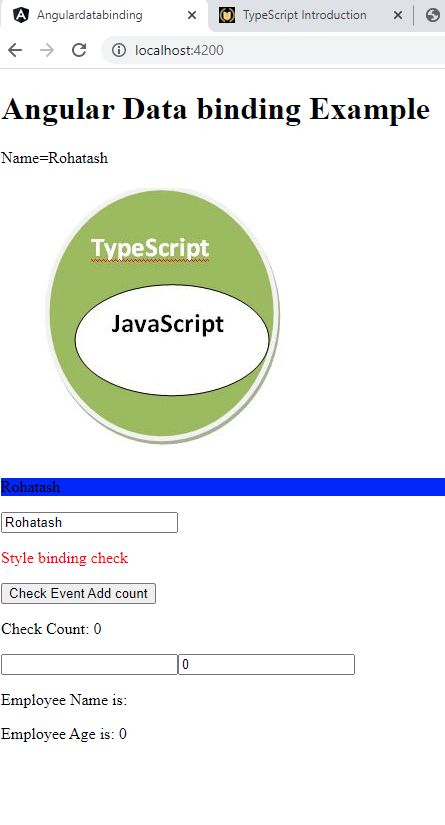
<h1>Angular Data binding Example</h1>
<p>Name={{name}}</p>
<h1><img [src]="imageurl"></h1>
<style>
.blue {
background-color: blue;
}
</style>
<p [class]="Classname">Rohatash</p>
<input type="text" [value]="nameattribute">
<p [style.color]="StyleColor">Style binding check</p>
<button (click)="addcounter()">Check Event Add count</button>
<p>Check Count: {{count}}</p>
<input type="text" [(ngModel)]="EmployeeName">
<input type="text" [(ngModel)]="EmployeeAge">
<p>Employee Name is: {{EmployeeName}}</p>
<p>Employee Age is: {{EmployeeAge}}</p>

<router-outlet></router-outlet>
Output
Prev Next