Angular Reactive Form Validation
In this tutorial we will learn about Reactive Forms validations and how to create reactive forms in angular. We will also make use of the classes avaliable to create in reactive form module.
Angular Reactive Form
The below points defines the Angular Reactive Form.
- Angular Reactive Forms are also called Model Driven Form that means we write the code inside the component class and also map the objects to the form controls on the view.
- The Reactive approach removes validation logic from the template, keeping the templates cleaner.It use an immutable approach to manage the state of a form.
- Each time a change occurs to the form, the FormControl instance will not update the existing data model, it will return a new state (a new data model).
- Reactive forms are synchronous when form inputs and values are provided as streams of input values, which can be accessed in a synchronous way.
- Reactive forms are synchronous makes scaling easier. It is reusable and helps a lot with large-scale forms.
- It provides synchronous access to the form and data models, and it can be tested without rendering the UI. So testing is easy.
Creating React Form with validation
When we create any reactive form in angular the following steps should make easy:
- Add Reactive Forms Module
- Import required module in Component
- Using FormGroup class
- Submitting Form
- Disabling the browser validation
- Adding in Built-in Validators Required, Minlength, Maxlength, Pattern
- Dirty, Touched and unTouched Attributes
- Disable Submit button
- Final Template code
- Output
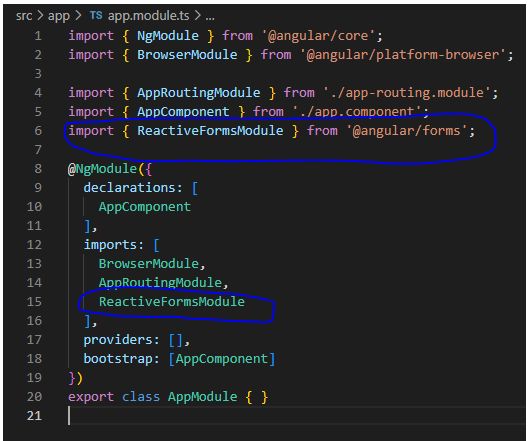
Step 1: Add Reactive Forms Module
When we start working with reactive forms, firstly add ReactiveFormsModle in the App Module as shown in the below image.
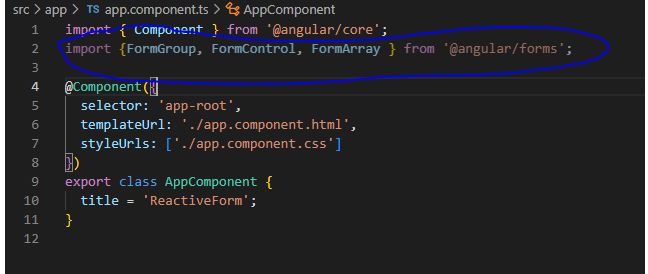
Step 2: Import Required module in Component
After first step we import as required reactive forms classes such as FormGroup, FormControl, FormArray in the components class. After importing the classes, your code will look something like this.
Step 3: Using FormGroup class
FormGroup as name suggested is a group of FormControls. You can encapsulate various FormControls inside a FormGroup. If you use single control then you use formcontrl class. Here we have created a Employee form, which is a FormGroup. It consists of group of controls for Firsname, lastname, Email etc. It is very easy to use a FormGroup on the view as shown below:
<form (ngSubmit)='EmployeeRegister()' [formGroup]='EmployeeForm'>
<p>employee Form</p>
<p>
<label for="firstname">First Name</label>
<input type="text" name="firstname" formControlName="firstname">
</p>

<p>
<label for="lastname">Last Name</label>
<input type="text" name="lastname" formControlName="lastname">
</p>

<p>
<label for="email">Email </label>
<input type="text" id="email" name="email" formControlName="email">
</p>

<p>
<label for="gender">Geneder</label>
<input type="radio" value="male" name="gender" formControlName="gender"> Male
<input type="radio" value="female" name="gender1" formControlName="gender"> Female
</p>
<p>
<button type="submit">Submit</button>
</p>
</form>
<router-outlet></router-outlet>
In the above code form group name is EmployeeForm and when we click on the button it will call EmployeeRegister() method in ts file.
<form (ngSubmit)='EmployeeRegister()' [formGroup]='EmployeeForm'>
Step 4: Submitting Form
In the component class, you can add a function as named EmployeeRegister() to submit the form as shown below:
import { Component, OnInit } from '@angular/core';
import { Validators, FormGroup, FormBuilder, MinLengthValidator } from '@angular/forms';

@Component({
  selector: 'app-root',
  templateUrl: './app.component.html',
  styleUrls: ['./app.component.css']
})
export class AppComponent implements OnInit {
   EmployeeForm: any;
  constructor(private fb: FormBuilder) { }
  ngOnInit(): void {
    this.EmployeeForm = this.fb.group({
      firstname: ['', [
        Validators.required,
        Validators.minLength(5),
        Validators.maxLength(8)
      ]],
      lastname: ['', [
        Validators.required,
        Validators.minLength(5),
        Validators.maxLength(8)
      ]],
      email: ['', [
        Validators.required,
        Validators.minLength(5),
        Validators.maxLength(8)
      ]],
      gender: ['', Validators.required]

    });
  }
  EmployeeRegister() {
    console.log(this.EmployeeForm.value);
  }
}5. Disabling the Browser validation
To disable by default browser validator interfering with the Angular validator. We use novalidate in form tag.
<form (ngSubmit)='EmployeeRegister()' [formGroup]='EmployeeForm' novalidate>6. Adding in Built-in Validators Required, Minlength, Maxlength, Pattern
HTML5 validation attributes:
- required: Value is required.
- minlength: The minimum characters are required as a value.
- maxlength: The maximum characters are required as a value.
- pattern: The value should match the pattern.
7. Dirty and Touched Attributes
We want to display errors only after the user has attempted to change the value. The dirty & touched properties help us do that.
- touched: A control is touched if the user has triggered a blur event on it.
- dirty: A control is dirty if the user has changed the value in the UI.
The below code difine the required , min, max and pattern validation. If any oneerror generate then it will fall in respective error message.
<div *ngIf="EmployeeForm.get('firstname').touched && EmployeeForm.get('firstname').invalid">
<div *ngIf="EmployeeForm.get('firstname').errors.required">
<span style="color: red;">Please Enter firstname.</span>
</div>
<div *ngIf="EmployeeForm.get('firstname').errors.minlength">
<span style="color: red;"> Password must be at least 5 characters</span>
</div>
<div *ngIf="EmployeeForm.get('firstname').errors.maxlength">
<span style="color: red;"> Username must not exceed 8 characters</span>
</div>
</div>We use it to set the disabled attribute of the submit button. The following code looks like that:
<button type="submit" [disabled]="!EmployeeForm.valid">Submit</button>Finally we have added all the above attribute in the template code which looks like the below code:
<form (ngSubmit)='EmployeeRegister()' [formGroup]='EmployeeForm' novalidate>
<p>employee Form</p>

<label for="firstname">First Name</label>
<input type="text" name="firstname" formControlName="firstname">
<div *ngIf="EmployeeForm.get('firstname').touched && EmployeeForm.get('firstname').invalid">
<div *ngIf="EmployeeForm.get('firstname').errors.required">
<span style="color: red;">Please Enter firstname.</span>
</div>
<div *ngIf="EmployeeForm.get('firstname').errors.minlength">
<span style="color: red;"> Password must be at least 5 characters</span>
</div>
<div *ngIf="EmployeeForm.get('firstname').errors.maxlength">
<span style="color: red;"> Username must not exceed 8 characters</span>
</div>
</div>
<p>
<label for="lastname">Last Name</label>
<input type="text" name="lastna me" formControlName="lastname">
</p>
<div *ngIf="EmployeeForm.get('lastname').touched && EmployeeForm.get('lastname').invalid">
<div *ngIf="EmployeeForm.get('lastname').errors.required">
<span style="color: red;">Please Enter lastname.</span>
</div>
<div *ngIf="EmployeeForm.get('lastname').errors.minlength">
<span style="color: red;"> lastname must be at least 5 characters</span>
</div>
<div *ngIf="EmployeeForm.get('lastname').errors.maxlength">
<span style="color: red;"> lastname must not exceed 8 characters</span>
</div>
</div>
<p>
<label for="email">Email </label>
<input type="text" id="email" name="email" formControlName="email">
</p>

<div *ngIf="EmployeeForm.get('email').touched && EmployeeForm.get('email').invalid">
<div *ngIf="EmployeeForm.get('email').errors.required">
<span style="color: red;">Please Enter email.</span>
</div>
<div *ngIf="EmployeeForm.get('email').errors.minlength">
<span style="color: red;"> email must be at least 5 characters</span>
</div>
<div *ngIf="EmployeeForm.get('email').errors.maxlength">
<span style="color: red;"> email must not exceed 8 characters</span>
</div>
</div>
<p>
<label for="gender">Geneder</label>
<input type="radio" value="male" name="gender" formControlName="gender"> Male
<input type="radio" value="female" name="gender1" formControlName="gender"> Female
</p>
<div *ngIf="EmployeeForm.get('gender').untouched && EmployeeForm.get('gender').invalid">
<div *ngIf="EmployeeForm.get('gender').errors.required"><span style="color: red;">Gender is required.</span></div></div>
<p>
<button type="submit" [disabled]="!EmployeeForm.valid">Submit</button>
</p>
</form>
<router-outlet></router-outlet>Now run the application.
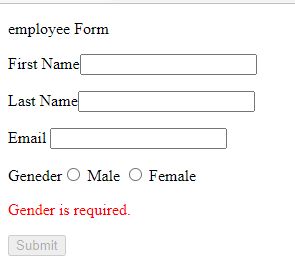
Now Touch the cursor from first name, lastname and email field.
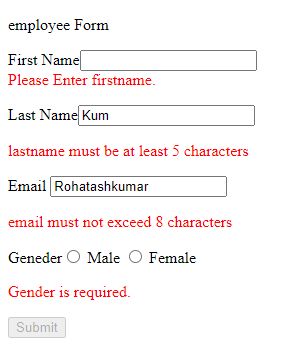
Now enter the correct data in all fields and click on submit button.
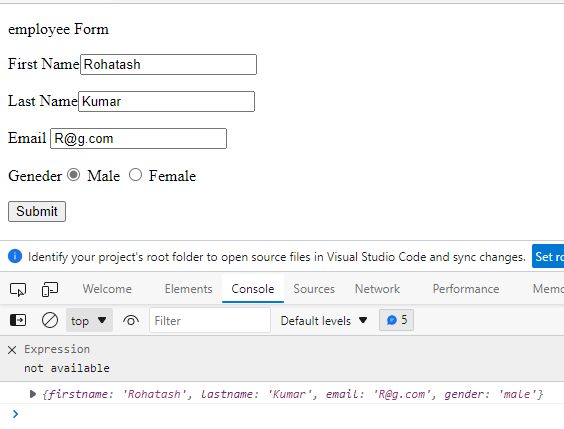
Prev Next