Angular Lifecycle Hook
Life Cycle Method
The events in the life of a component are also referred to as lifecycle hooks. The Component is the main building block of angular the application so it is very important to understand the life cycle processing hook methods steps of the components. There are Eight different stages in the component lifecycle from start to end. Angular executes these hook methods in the following order as shown below.
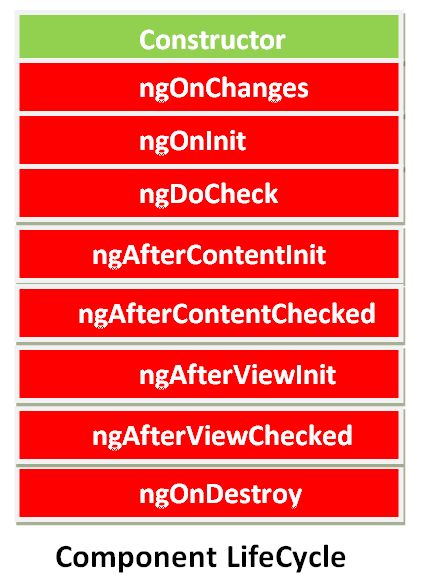
Every stage is called life cycle hook events.
- Constructor
- ngOnChanges
- ngOnInit
- ngDoCheck
- ngAfterContentInit
- ngAfterContentChecked
- ngAfterViewInit
- ngAfterViewChecked
- ngOnDestroy
Constructor
A component is a typescript class, So component class must have a constructor method. The constructor of the component class executes before the other life cycle hook event. If we need to inject any dependencies into the component, then the constructor is the best place to inject that dependency. After executing the constructor, Angular executes component life cycle hook methods in a specific order as shown above.
Following is a description of each lifecycle hook.
1. ngOnChanges
When the value of a data bound property changes then every time this method is called. When you use @Input decorator in your component and the value of this input property is changed then ngOnChanges lifecycle method gets called.
2. ngOnInit
This is called whenever the initialization of the directive or component after Angular first displays the data-bound properties happens. This lifecycle hook gets executed once the component is instantiated. ngOnInit is called after the constructor is created.
3. ngDoCheck
It is executed every time the process of change detection takes place. This hook is most useful to detect and act upon the changes that can not be detected by Angular on its own.
4. ngAfterContentInit
This is called in response after Angular projects external content into the component's view. This one is invoked just once after ngDoCheck() and once all the bindings of the components have been checked.
5. ngAfterContentChecked
This is called in response after Angular checks the content projected into the component.
6. ngAfterViewInit
It is called after the component's view and child views has been initialized.
7. ngAfterViewChecked
This is called in response after Angular checks the component's views and child views.
8. ngOnDestroy
This lifecycle hook is executed once the component is destroyed. This lifecycle is used to implement code related to clean-up work. Using ngOnDestroy makes sense when you want to implement customized behavior when a component is destroyed. ngOnDestroy can be helpful when you need to unsubscribe from observables or perform any other clean up when destroying a component.
Example - Lifecycle Hooks in Action
In this example we define the life cycle hook methods directly on the component class.
Create an application
The following command uses the Angular CLI to create a Angular application. The application name in the following example is anglarlifecyclehook.
ng new anglarlifecyclehookAdding components
The following command uses the Angular CLI to create component. The components name in the following example is Employee.
ng generate component EmployeeAfter creating our components. Add the following code in employee.component.ts file
import { Component, Input, OnInit, SimpleChanges, OnDestroy } from '@angular/core';

@Component({
  selector: 'app-employee',
  templateUrl: './employee.component.html',
  styleUrls: ['./employee.component.css']
})
export class EmployeeComponent implements OnInit {

  @Input() employees: any[]=[];
  constructor() {
    console.log('constructor');
  }

  ngOnChanges(changes: SimpleChanges) {
    console.log('ngOnChanges');
    console.log(changes);
  }

  ngOnInit() {
    console.log('ngOnInit');
  }

  ngDoCheck() {
    console.log('ngDoCheck');
  }

  ngAfterContentInit() {
    console.log('ngAfterContentInit');
  }

  ngAfterContentChecked() {
    console.log('ngAfterContentChecked');
  }

  ngAfterViewInit() {
    console.log('ngAfterViewInit');
  }

  ngAfterViewChecked() {
    console.log('ngAfterViewChecked');
  }
  add() {
    this.employees.push("Rohatash");
    console.log('ngOnChanges2');
  }

  ngOnDestroy() {
    this.employees=[];
    console.log('ngOnDestroy');
  }
}
Adding the following code in employee.component.html file
<h1>Life Cycle Hooks Example</h1>
<button class='btn btn-primary' (click)="add()">Add</button>
<button class='btn btn-primary' (click)="ngOnDestroy()">Destroy</button>
Now Adding the following code in app.component.ts file
import { Component } from '@angular/core';

@Component({
  selector: 'app-root',
  templateUrl: './app.component.html',
  styleUrls: ['./app.component.css']
})
export class AppComponent {

  Employee = ['Rahul', 'Ravindar', 'Ritesh'];
  addemployee() {
    this.Employee.push('Rohatash');
  }

}
Adding the following code in app.component.html file
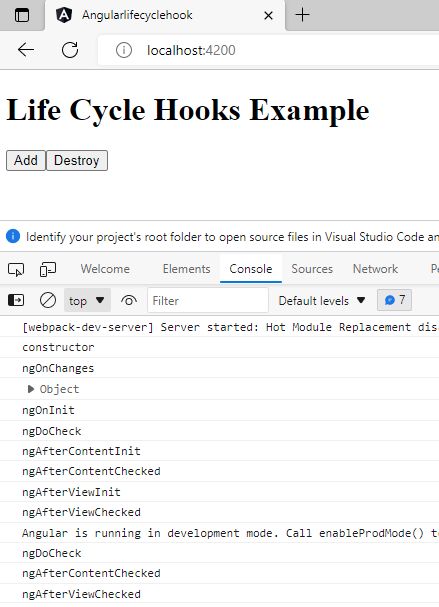
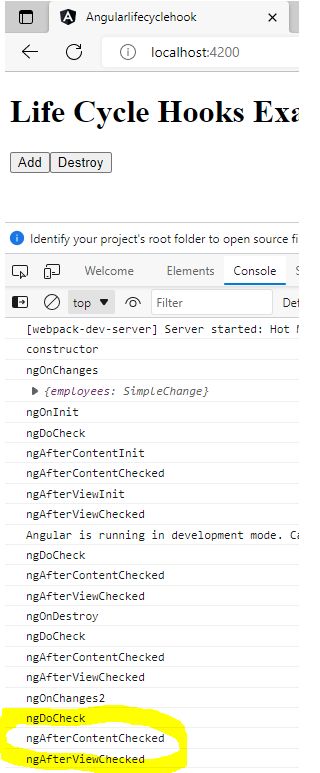
<app-employee [employees]='Employee'></app-employee>Now run the application and to check console press Ctrl+Shift+j or right click->inspect on a PC and go to the Console Tab.
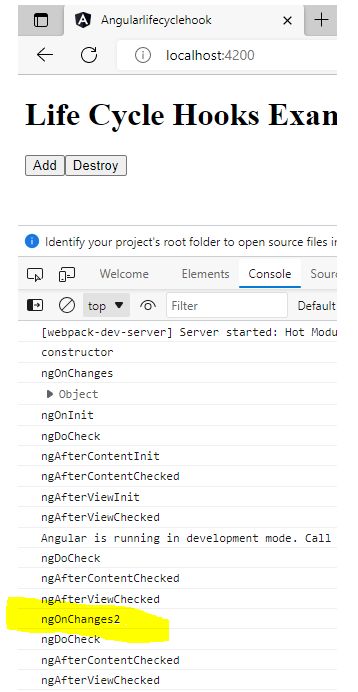
Now click on Add button will fire ngOnChange again.
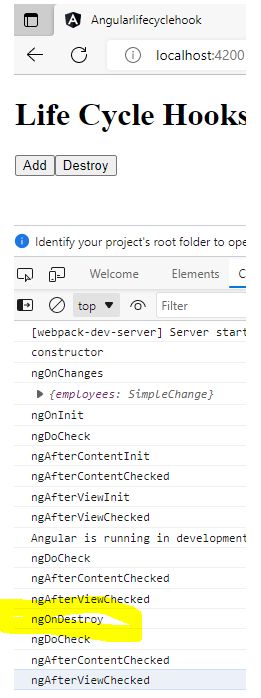
Now click on the the destroy button will fire ngOndestroy.
When you click the add button It will also called every time below three hooks.
Prev Next