ReactJS JSX
In this tutorial, we will discuss about JSX, why we use JSX, advantage and disadvantage of JSX.
- JSX Introduction
- Why we use JSX?
- Advantage of JSX
- Disadvantage of JSX
- How to use JSX in React?
1. JSX Introduction
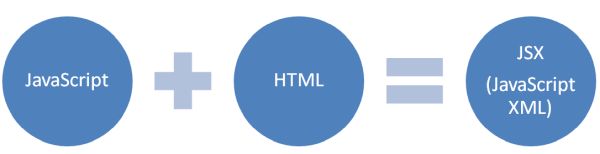
- JSX stands for JavaScript XML.
- We can write HTML in React thanks to JSX.
- It allows us to directly write HTML in React (within JavaScript code).
- Instead of separating the markup and logic in separated files, React uses components for this purpose.
- React is a declarative, effective, and adaptable JavaScript user interface library. But React code should be written in something called JSX rather than standard JavaScript.
- JSX provides you to write HTML/XML like structures.
- Based on ES6, JSX is a JavaScript extension that is runtime converted into ordinary or simple JavaScript.
- Use create-react-app which internally uses Babel for the JSX to JavaScript conversion.
The following is the pictorical representation of JSX:
For Example
const Test = <h1>TutorialsTrend</h1>;The code snippet above is not HTML or JavaScript, instead, it is JSX. It uses a JavaScript-like variable test and HTML Code <h1>TutorialsTrend</h1>.
2. Why we use JSX ?
You can use React without JSX, but the benefits of using it so far surpass our imagination. With JSX, lots of things are more straightforward, and these might include:
- It performs optimizations while translating to normal JavaScript, making it faster.
- It facilitates the creation of templates for us.
- ReactJS uses components for this instead of separating the markup and logic in different files.
- Using JSX you write less code and get the same results to increase productivity while working with React JS.
3. Advantages of JSX
The below are the following advantage when we use JSX:
- React makes it simpler to add or write HTML thanks to JS
- HTML tags can be quickly converted to react elements using JSX.
- Compared to standard JavaScript, it is faster.
- The majority of the mistakes may be identified during compilation because it is type-safe.
- JSX prevents XSS (cross-site-scripting) attacks popularly known as injection attacks.
4. Drawbacks(Disadvantage) of JSX
The below are the following Disadvantage when we use JSX:
- If the HTML is incorrect, JSX will throw an error.
- HTML code must be contained within a single top-level element in JSX to avoid errors.
- JSX will issue an error if HTML elements are not properly closed.
Creating an App
Create a new React project After the installation of React, you can create a new react project using create-react-app command.
npx create-react-app firstreactappRun the above command will create a directory called firstreactapp inside the current folder. Inside that directory, it will generate the initial project structure and install the transitive dependencies.
Run the following command on Visual Studio Code:
PS E:\AngularProgram\Reactjs> cd firstreactapp
E:\AngularProgram\Reactjs\firstreactapp> npm start
NPM is a package manager which starts the server and access the application at default server http://localhost:3000.

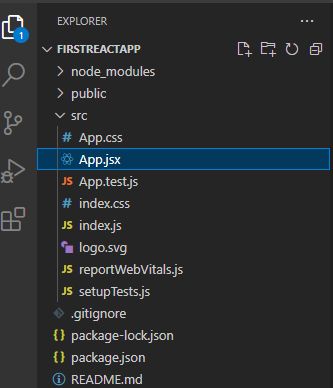
Now move into the project folder and open src/App.js. File looks like below:
Code:
import React from 'react';
import logo from './logo.svg';
import './App.css';

function App() {
return (
<div className="App">
<header className="App-header">
<img src={logo} className="App-logo" alt="logo" />
<p>
Edit <code>src/App.js</code> and save to reload.
</p>
<a
className="App-link"
href="https://reactjs.org"
target="_blank"
rel="noopener noreferrer"
>
Learn React
</a>
</header>
</div>
);
}

export default App;
Now Delete the line import logo from './logo.svg and everything after the return statement in the function. Change it to return null. The final code will look like this:
import React from 'react';
import './App.css';

function App() {
return null;
}

export default App;
5. How to use JSX in React?
JSX looks similar to a regular HTML in most cases, but there are some things to consider when working with it. These include:
1. Nested Elements
You can add elements as children of other components using JSX. Consider the scenario when you need to provide multiple tags at once; you must first nest them all inside a parent tag that is rendered to the HTML. The parent element's child tags or children will be all other subtags. To prevent an error, all items must be correctly closed.
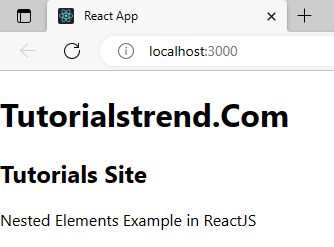
Now add the following code in src/App.js for Nested Element:
import './App.css';

function App() {
return (
<div>
<h1>Tutorialstrend.Com</h1>
<h2>Tutorials Site</h2>
<p > Nested Elements Example in ReactJS</p>
</div>
);
}
export default App;
Output
2. Attributes
As with conventional or standard HTML, attributes can be used with HTML components for JSX. However, JSX substitutes the camelCase naming convention for the traditional HTML name convention. For instance, for becomes htmlFor and className becomes class. This takes place in order to prevent problems caused by HTML naming, since words like class frequently function as reserved JavaScript keywords. Additionally, JSX gives us the option to specify attribute values as either string laterals (hard-coded strings enclosed in quotations) or as expressions (using curly braces). Additionally, you can use custom attributes with data-prefixed names.
Now add the following code in App.css file
.container {
  display: flex;
  flex-direction: column;
  align-items: center;
}
Now add the container as attribute in App.js file
import './App.css';

function App() {
return (
<div className='container'>
<h1>Tutorialstrend.Com</h1>
<h2>Tutorials Site</h2>
<p > Nested Elements Example in ReactJS</p>
</div>
);
}
export default App;
Output

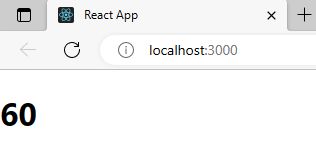
3. JavaScript Expression
With JSX, standard JavaScript expressions are supported. Any of these expressions must be enclosed in curly brackets {} in order to be used in JSX-written code. If-else is not supported by JSX, although but we can use conditional expressions.
import './App.css';

function App() {
return (
<div >
<h1>{40+20}</h1>
</div>
);
}
export default App;
Output
4. Comments
We can utilise comments in a similar way to how we use JavaScript expression with JSX. These are wrapped in curly brackets but begin /* and ends with */
import './App.css';

function App() {
return (
<div >
<h1>{40+20}</h1>
</div> /* This is used for a comment in JSX */
);
}
export default App;
5. Styling
Inline styles are recommended when using React. The camelCase syntax should be used when specifying these styles, and React will automatically append px after the figure value on particular items.
import './App.css';

function App() {
{
var container = {
fontSize: 80,
fontFamily: 'Courier',
color: '#003300'
}
return (
<div >
<h1 class={container}>TutorialsTrend Site</h1>
</div> /* This is used for a comment in JSX */
);
}
}
export default App;
Output

Prev Next