.NET Core - Data Migration
In this article, we will learn how to create SQL tables using .NET Core automatically that process is called data migration in .NET Core simplifies and streamlines the management of database schema changes, reduces manual effort, and provides a structured approach to evolving your database schema over time. To do that first we create properties in .NET Core and run the commands to create automatically tables in SQL Server database.
Advantages of data migration in .NET Core
Using data migration in .NET Core offers several advantages.
- Simplified database schema management - Data migration allows you to manage the evolution of your database schema over time in a structured manner. It provides a way to define and apply incremental changes to the database schema without losing existing data.
- Version control for database schema - Data migrations are typically stored as files in your project, making them easy to version control using Git or other source control systems. This enables collaboration and helps track changes to the database schema over time.
- Database portability - Data migration enables you to deploy your application with its associated database schema to different environments (development, testing, production) easily. By applying migrations, you can ensure that the database schema is consistent across different environments.
- Seamless updates - When deploying updates to your application, data migration allows you to apply database schema changes without requiring manual intervention or recreating the entire database. It automates the process of updating the schema, preserving existing data, and ensuring data integrity.
- Rollback and recovery - Data migration keeps track of applied migrations, allowing you to easily roll back to a previous version of the database schema if needed. This feature provides a safety net during development or in case of issues during deployment.
- Database history and auditing - By storing migration scripts, you maintain a historical record of changes made to the database schema. This audit trail can be valuable for tracking changes, troubleshooting issues, and complying with regulatory requirements.
To create SQL tables using .NET Core, you can follow these steps:
Step 1: Create a New Project in Visual Studio
Create a new project in Visual Studio or any preferred IDE using .NET Core named as datamigration.
Step 2: Establish a Database Connection
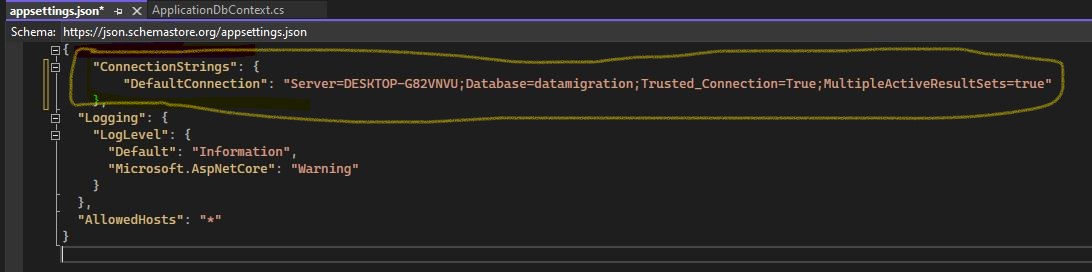
In your application, establish a connection to the SQL Server database using the connection string. The connection string contains information such as the server name, database name, credentials, etc. You can store the connection string in the appsettings.json file or retrieve it from other configuration sources. Now change the following according to own database connection.
"DefaultConnection": "Server=DESKTOP-G82VNVU;Database=datamigration;Trusted_Connection=True;MultipleActiveResultSets=true"
Step 3: Define the Table Schema
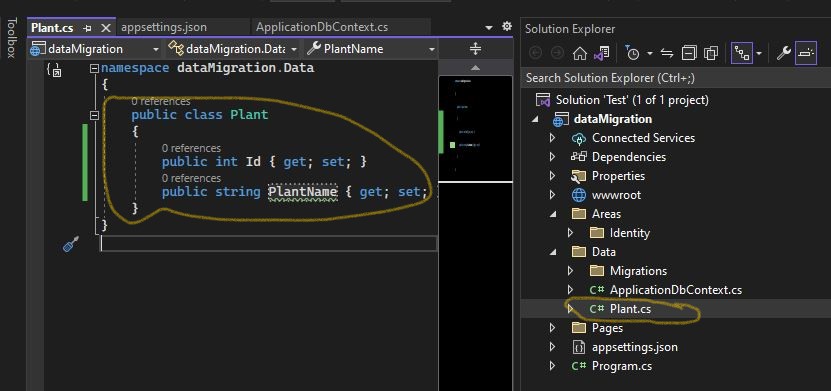
Create a class file named as Plants.cs inside data folder and decide on the table schema, including the table name and column definitions. You can create a class representing the table schema using attributes to define the column names, data types, constraints, and relationships.
namespace dataMigration.Data
{
    public class Plant
    {
        public int Id { get; set; }
        public string PlantName { get; set; }
    }
}
Step 4: Create the Database Context
You can Create a class or define already created class file Data->ApplicationDbContext.cs that derives from the DbContext class provided by Entity Framework Core. This class represents the database context and allows you to interact with the database using LINQ queries.
using dataMigration.Data;
using Microsoft.AspNetCore.Identity.EntityFrameworkCore;
using Microsoft.EntityFrameworkCore;

namespace Test.Data
{
    public class ApplicationDbContext : IdentityDbContext
    {
        public ApplicationDbContext(DbContextOptions<ApplicationDbContext> options)
        : base(options)
        {
        }
        public DbSet<Plant> Plants { get; set; }

        protected override void OnModelCreating(ModelBuilder modelBuilder)
        {
             base.OnModelCreating(modelBuilder);
            // Configure additional table relationships or constraints if needed
        }
    }
}
Step 5: Enable Migrations
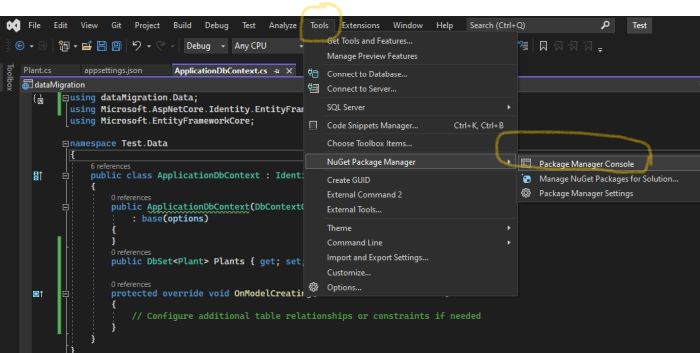
Open the Package Manager Console and Run the following command to enable migrations.
Add-Migration
Now select Tool -> NutGet Package Manager -> Package Manager Console
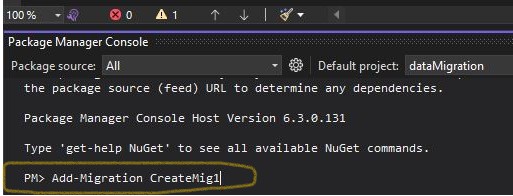
Now add the following command and press enter.
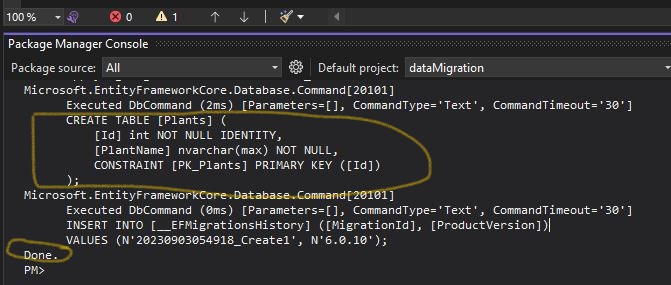
After successfully run the above command now update in Databse using the following command.
Update-Database
After run the above Command the following status will display.
Now open SQL Server Database and Check the database and created Plant table.
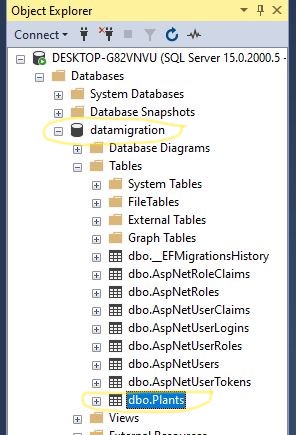
That's it. You have successfully created SQL tables using .NET Core.
Next