.NET Core - Dependency Injection
In this article, we use ASP.NET Core 6.0 in Visual Studio 2022. you can follow these steps. we Dependency Injection (DI) is a design pattern and a core principle in .NET Core that promotes loose coupling and enhances the maintainability and testability of applications. It allows you to achieve inversion of control by removing direct dependencies between components and instead injecting dependencies from external sources. This approach promotes flexibility, testability, and maintainability in your .NET Core application.
Here's an explanation of the concept of dependency injection in .NET Core.
In traditional programming, a class often creates instances of its dependent classes directly, resulting in tight coupling. This can make the codebase difficult to maintain and test because changes to one class may require modifications in multiple places.
Dependency injection solves this problem by introducing a third-party component, often referred to as an "IoC container," that manages the creation and lifetime of objects. The IoC container takes responsibility for resolving dependencies and injecting them into classes that need them.
Types of dependency injection in .NET Core
There are two main types of dependency injection: constructor injection and property injection.
- Constructor injection - Constructor injection is the most common type of dependency injection. In constructor injection, we inject the dependency into the class constructor.
- Method Injection - In this case, you create an instance of your dependency and pass it to a specific method of the dependent class.
- Property injection - Property injection is less common than constructor injection. In property injection, we inject the dependency into a property of the class.
Advantages of dependency injection in .NET Core
Here are some of the advantages of using dependency injection in .NET Core.
- Loose coupling - Dependency injection allows us to decouple our classes from their dependencies. This makes our code more maintainable and easier to test.
- Testability - Dependency injection makes our code more testable because we can mock out dependencies in our unit tests.
- Extensibility - Dependency injection makes our code more extensible because we can easily swap out dependencies.
- Reusability - Dependency injection makes our code more reusable because we can easily share dependencies between different classes.
Overview of dependency injection
A dependency is an object that another object depends on. Examine the following MyDependency class with a WriteMessage method that other classes depend on:
public class MyDependency
{
    public void WriteMessage(string message)
    {
        Console.WriteLine($"MyDependency.WriteMessage called. Message: {message}");
    }
}
A class can create an instance of the MyDependency class to make use of its WriteMessage method. In the following example, the MyDependency class is a dependency of the IndexModel class:
public class IndexModel : PageModel
{
    private readonly MyDependency _dependency = new MyDependency();

    public void OnGet()
    {
        _dependency.WriteMessage("IndexModel.OnGet");
    }
}
The class creates and directly depends on the MyDependency class. Code dependencies, such as in the previous example, are problematic and should be avoided for the following reasons.
- To replace MyDependency with a different implementation, the IndexModel class must be modified.
- If MyDependency has dependencies, they must also be configured by the IndexModel class. In a large project with multiple classes depending on MyDependency, the configuration code becomes scattered across the app.
- This implementation is difficult to unit test.
Dependency injection addresses these problems through.
- The use of an interface or base class to abstract the dependency implementation.
- Registration of the dependency in a service container. ASP.NET Core provides a built-in service container, IServiceProvider. Services are typically registered in the app's Program.cs file.
- Injection of the service into the constructor of the class where it's used. The framework takes on the responsibility of creating an instance of the dependency and disposing of it when it's no longer needed.
How to Use Dependency Injection in .NET Core
In a .NET Core Web API project, dependency injection is a fundamental concept that allows you to manage and resolve dependencies efficiently. Here's a simple example of how to use dependency injection in a .NET Core Web API project.
In this example, we created a service interface (IMyService) and its implementation (MyService). We configured dependency injection in the Startup.cs file and injected the IMyService dependency into the MyController. This allows for easier testing, maintainability, and scalability of your .NET Core Web API project.
Step 1: Create a Service Interface and Implementation
Let's create a simple service interface and implementation that we'll inject into our controller:
Create an interface named IMyService.cs in the project.
namespace Swtest
{
    public interface IMyService
    {
        string GetMessage();
    }

      //Create a class that implements this interface

    // MyService.cs
    public class MyService : IMyService
    {
        public string GetMessage()
        {
            return "TutorialsTrend.com";
        }
    }
}
Step 2: Configure Dependency Injection
In your Program.cs file, configure dependency injection by adding the service and its implementation in the ConfigureServices method:
using Swtest;

var builder = WebApplication.CreateBuilder(args);

// Add services to the container.

builder.Services.AddControllers();
// Learn more about configuring Swagger/OpenAPI at https://aka.ms/aspnetcore/swashbuckle
builder.Services.AddEndpointsApiExplorer();
builder.Services.AddSwaggerGen();

//Register your service with the dependency injection container
builder.Services.AddSingleton();
var app = builder.Build();

// Configure the HTTP request pipeline.
if (app.Environment.IsDevelopment())
{
    app.UseSwagger();
    app.UseSwaggerUI();
}

app.UseHttpsRedirection();
app.UseAuthorization();
app.MapControllers();
app.Run();
Step 3: Use the Service in a Controller
Now, you can inject the IMyService dependency into a controller named MyController.cs.
using Microsoft.AspNetCore.Http;
using Microsoft.AspNetCore.Mvc;

namespace Swtest
{
    [Route("api/[controller]")]
    [ApiController]
    public class MyController : ControllerBase
    {
        private readonly IMyService _myService;

        public MyController(IMyService myService)
        {
            _myService = myService;
        }

        [HttpGet]
        public IActionResult Get()
        {
            var message = _myService.GetMessage();
            return Ok(message);
        }
    }
 }
Step 4: Run the Application
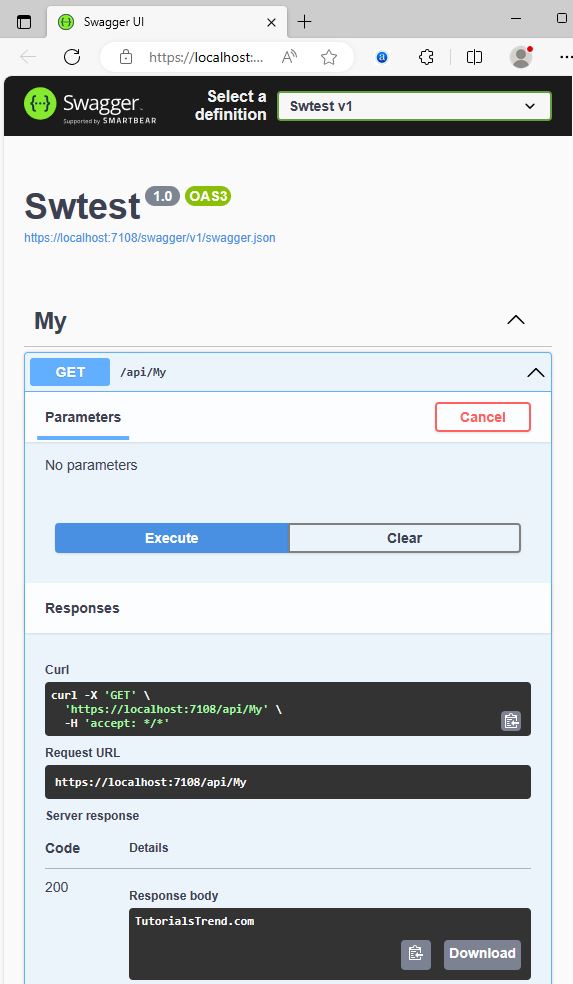
You can now run your .NET Core Web API application
Visit https://localhost:1123/api/my in your browser or use a tool like swagger to make a GET request. You should receive a response with the message "TutorialsTrend.com".
Next