JavaScript Event Propagation
In this tutorials, we'll discuss the Event Propagation in detail. Event propagation in JavaScript refers to the way events are handled as they "propagate" or "bubble" up through the DOM (Document Object Model) hierarchy from the target element where they originated to its ancestors.
In modern browser event propagation proceeds in two phases capturing, and bubbling phase in JavaScript.
- Bubbling
- Stopping Bubbling
- Capturing
1. Bubbling
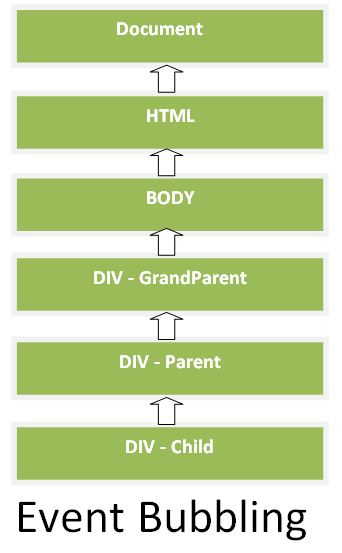
In bubbling, the event starts at the target element and then "bubbles" up to all of its ancestor elements. While developing a webpage or a website via JavaScript, the concept of event bubbling is used where the event handlers are invoked when one element is nested on to the other element and are part of the same event. This technique or method is known as Event Bubbling.
We can also understand the flow of Bubbling event with the help of the below flow chart.
Example
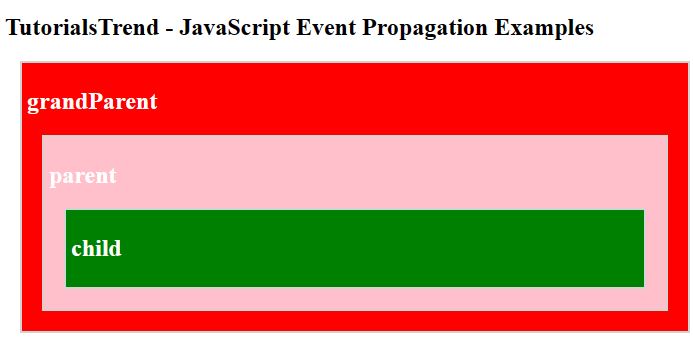
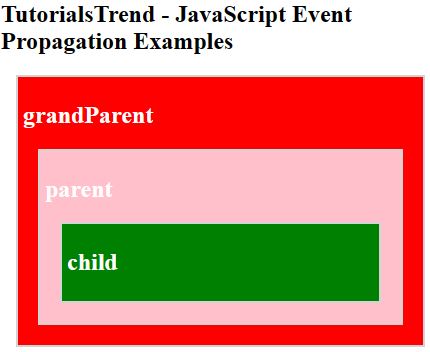
In this example, we have a grandparent<div>, parent <div> element with a child <div> element inside it. We've added event listeners to the grandparent, parent and child elements that will log a message to the console when they're clicked.
To understand bubbling concepts more clearly first we'll create nested HTML Elements and attach an event listener to them.
<!DOCTYPE html>
<html>
<head>
<title></title>
<style>
.grandParent {
display: block;
border: 2px solid lightgrey;
color: white;
padding: 5px;
margin: 15px;
background: red;
}
.parent {
display: block;
border: 2px solid lightgrey;
color: white;
padding: 5px;
margin: 15px;
background: pink;
}
.child {
display: block;
border: 2px solid lightgrey;
color: white;
padding: 5px;
margin: 15px;
background:green;
}
</style>
</head>
<body>
<h2>TutorialsTrend - JavaScript Event Propagation Examples</h2>
<div id="grandParentid" class="grandParent">
<h2>grandParent</h2>
<div id="parentid" class="parent">
<h2>parent</h2>
<div id="childid" class="child">
<h2>child</h2>
</div>
</div>
</div>
<script>
// Get references to the Grandparent, parent and child elements
const grandParent = document.getElementById('grandParentid');
const parent = document.getElementById('parentid');
const child = document.getElementById('childid');
// Add a click event listener to the Grandparent element
grandParent.addEventListener('click', () => {
console.log('GrandParent clicked!');
});
// Add a click event listener to the parent element
parent.addEventListener('click', () => {
console.log('Parent clicked!');
});
// Add a click event listener to the child element
child.addEventListener('click', () => {
console.log('Child clicked!');
});
</script>
</body>
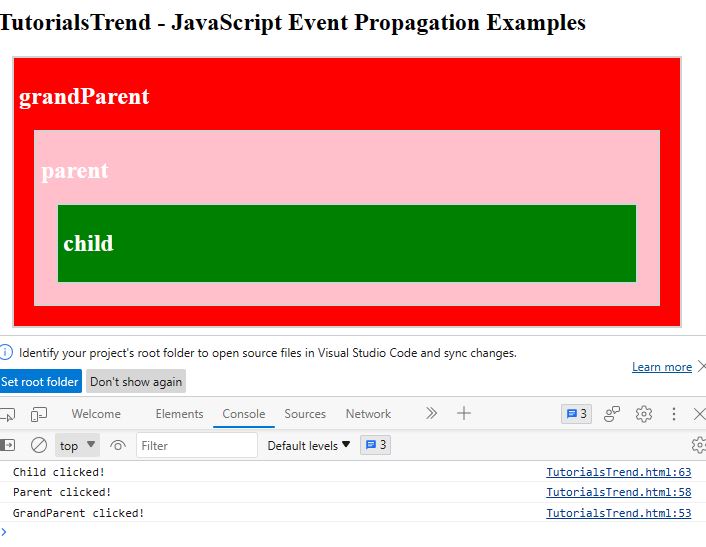
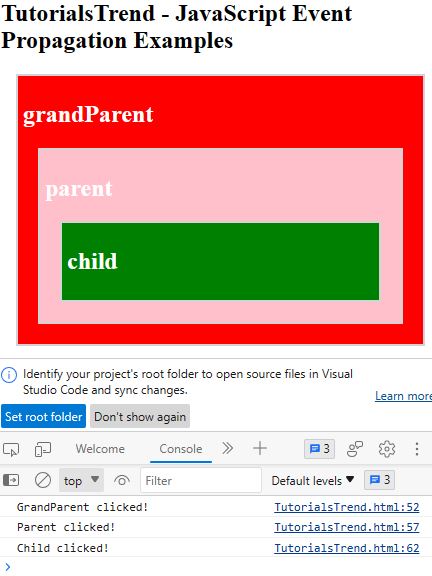
</html>Output
if we click the child div then the event is triggered and it is first handled by the innermost element and then propagated to the outer divs.
2. Stopping Bubbling
Beginning from the target and moving towards the top is the bubbling i.e. starting from the child to its parent, it moves straight upwards. But a handler can also take decision to stop the bubbling when the event has been processed completely. In JavaScript, we use the event.stopPropagation() method.
Example
<!DOCTYPE html>
<html>
<head>
<title></title>
<style>
.grandParent {
display: block;
border: 2px solid lightgrey;
color: white;
padding: 5px;
margin: 15px;
background: red;
}
.parent {
display: block;
border: 2px solid lightgrey;
color: white;
padding: 5px;
margin: 15px;
background: pink;
}
.child {
display: block;
border: 2px solid lightgrey;
color: white;
padding: 5px;
margin: 15px;
background: green;
}
</style>
</head>
<body>
<h2>TutorialsTrend - JavaScript Event Propagation Examples</h2>
<div id="grandParentid" class="grandParent">
<h2>grandParent</h2>
<div id="parentid" class="parent">
<h2>parent</h2>
<div id="childid" class="child">
<h2>child</h2>
</div>
</div>
</div>
<script>
// Get references to the Grandparent, parent and child elements
const grandParent = document.getElementById('grandParentid');
const parent = document.getElementById('parentid');
const child = document.getElementById('childid');
// Add a click event listener to the Grandparent element
grandParent.addEventListener('click', () => {
console.log('GrandParent clicked!');
});
// Add a click event listener to the parent element
parent.addEventListener('click', () => {
console.log('Parent clicked!');
});
// Add a click event listener to the child element
child.addEventListener('click', () => {
event.stopPropagation();
console.log('Child clicked!');
});
</script>
</body>
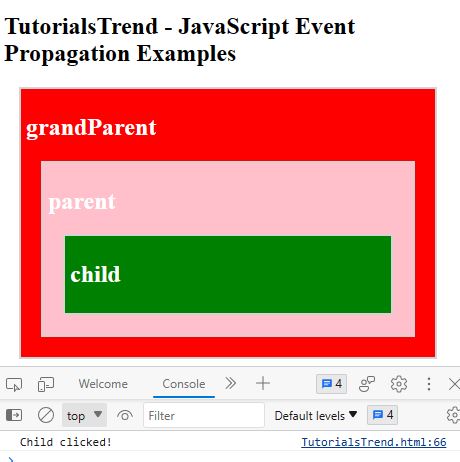
</html>In the above code, when we click on the child <div>, it will not work because event.stopPropagation () method is being invoked here due to which the parent function will not be invoked.
Output
3. Capturing
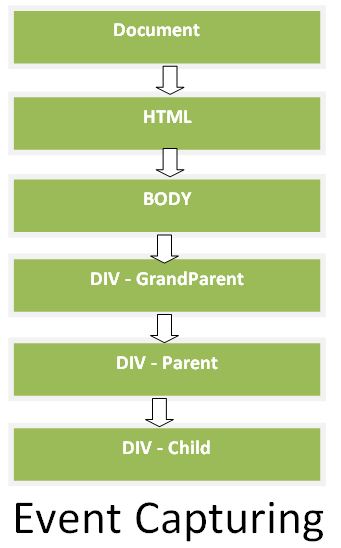
Event Capturing is also known as Event Trickling. Event Capturing is opposite to event bubbling, where in event capturing, an event moves from the outermost element to the target. In capturing, the event starts at the document object and then "captures" its way down to the target element.
We can also understand the flow of Capturing event with the help of the below flow chart.
Example
In this example, we have the same grandparent <div>, parent <div> element with a child <button> element inside it. We've added event listeners to the grandparent, parent and child elements, but this time we've set the useCapture parameter to true when adding the event listeners to enable event capturing.
To understand capturing concepts more clearly first we'll create nested HTML Elements and attach an event listener to them.
<!DOCTYPE html>
<html>
<head>
<title></title>
<style>
.grandParent {
display: block;
border: 2px solid lightgrey;
color: white;
padding: 5px;
margin: 15px;
background: red;
}
.parent {
display: block;
border: 2px solid lightgrey;
color: white;
padding: 5px;
margin: 15px;
background: pink;
}
.child {
display: block;
border: 2px solid lightgrey;
color: white;
padding: 5px;
margin: 15px;
background:green;
}
</style>
</head>
<body>
<h2>TutorialsTrend - JavaScript Event Propagation Capture Examples</h2>
<div id="grandParentid" class="grandParent">
<h2>grandParent</h2>
<div id="parentid" class="parent">
<h2>parent</h2>
<div id="childid" class="child">
<h2>child</h2>
</div>
</div>
</div>
<script>
// Get references to the Grandparent, parent and child elements
const grandParent = document.getElementById('grandParentid');
const parent = document.getElementById('parentid');
const child = document.getElementById('childid');


// Add a click event listener to the Grandparent element
grandParent.addEventListener('click', () => {
console.log('GrandParent clicked!');
}, true);

// Add a click event listener to the parent element
parent.addEventListener('click', () => {
console.log('Parent clicked!');
}, true);

// Add a click event listener to the child element
child.addEventListener('click', () => {
console.log('Child clicked!');
}, true);
</script>
</body>
</html>
Output
Note - Due to event capturing, the event of the parent element executes first, and then the event of the target element gets executed.
if we click the child div then the event is triggered and it is first handled by the outermost element and then propagated to the inner divs.
Prev Next